Showing posts with label Ideas. Show all posts

29.6.14

Regenerative Blogging

I appreciate that this blog has been sparse on updates, but I'd like to give a few short messages about the future of this blog, and indeed my future:
  1. This blog needs a re-vamp - name's too hard to google, sounds like a 15-year-old came up with it (because he did) and I don't feel like I'm writing with as much finesse as I'd like.
  2. That house didn't come to me in the end - my friends live there, but the landlord (my pal's dad) didn't trust me on the grounds of my contractor job, pity...
  3. The SLA 3D Printer design is virtually ready - I've enquired about pricing for the laser cutting and it came to £400 inc VAT, add £160 for 3D printed parts (I need clamps for the Projector mount among other things) and you have an expense comparable to a cheap 4K monitor (yum).
  4. Talking of which, my PC needs new hardware - not just a new GPU, but both my monitors predate LED backlight technology and I generally need to invest in my PC to reinvigorate it.
I know, a pitifully short update, but I'm still thinking over which direction I can take my life such that I can take the time to make engaging, fully-featured posts without the slovenly tiredness that characterizes the end of a working day.  I need to bring my income in-line with my values and skills as much as possible and earn enough to afford tools and materials without working myself into the ground.

5.4.14

All quiet on the whimsical front...

I've been a bit of a ghost on this blog for quite some time now, so much of my energy is diving into my SLA 3D Printer Project over at the Tawe TMD blog it's unreal, I'm actually making use of my University Education, in my spare time, no less!

Anyway, here be a few life-related updates on my end:

  1. Me and two of my pals have found a terraced 3-bedroom house only 30 mins away from my parent's house to move out to; the deal is that my pal's gran owns the place and staunchly refuses to sell, old age doing what is does to your sentimentality; this pal's dad has negotiated a bargain rent for us, the magic man that he is.  The only caveat - it's suffered hideous treatment from the previous residents, with some of the doors showing their cardboard honeycomb structures!  That'll take at least a month to work into an acceptable condition...
  2. I've found some employment at an engineering firm in Farnborough on a contractual basis, I'm hoping to secure a full-time position by way of performance but either way, combined with the through-the-floor rent at the new place (shared rent ftw) means a massive boon to my projects, assuming I don't blow it all on an Ivy Bridge Extreme PC I don't need.
  3. I want to be free...  because rule of 3...
Just for fun, I'll throw in some of the project ideas I have buzzing around my noggin, simply because containing my imagination is like keeping water in a bowl made of paper towels - not fun when you are trying to focus on getting just *one* project done:
  • A new PC Case:  I've got an eye on a few manufactured cases to replace my antiquated workstation case, such as the Zalman Z12 Plus or even going mini-ITX with a Corsair 250D, but I still want a case with as many Bitfenix Spectre Pro 230mm fans as possible so I wouldn't count on that.
  • PC Upgrades:  my GTX 560 is now thoroughly trounced by a card that doesn't even have a PCI-E power connector (The GTX 750 Ti), my HDD is 6 years old and my Corsair RM850 is going completely to waste only powering 250W during gaming sessions; not so sure I want to give my i5-2500K up though, a truly timeless CPU.
  • A Python Recumbent Bicycle:  I don't really feel like I'm being so efficient on an upright bike anymore, the most glaring problem is the wind, but there's also the issue of the huge moment arm that gravity has in bringing your head into sharp contact with the road.
  • A Model Railway:  There's space for a shed at the new house, and my pals are okay with it, why not?
  • Network Attached Storage:  Not a sexy thing, but it'll be a fun exercise in configuring a linux PC and backing up will be easier than with a USB3 HDD.
  • A new Kick Scooter:  I've got a Razor A5 Lux and it flies at warp speed compared to walking, but why not make one with a 100mm suspension fork and hydraulic disc brakes?
  • 100 things to do with a Raspberry Pi.

7.2.14

SLA 3D Printer Log 1: Projection, Projection...

In between dreaming of a house where model trains bring me pre-mixed Robinson's squash and keenly observing the cathartic tidal wave of backlash against Dungeon Keeper Mobile I have received a 720p projector from Ebay, costing £250.  Before launching into the specifics of how to use it, let's examine the unit itself.
The book is A4 width (and 2cm shorter lengthways) for comparison, and the unit weighs 1.13kg
The unit is actually 206 x 162 x 75mm (lxwxh), feels like a quality implementation despite it's low weight and is highly intuitive to operate; this isn't surprising when we learn that this model (Nobo X22PW) is simply a rebranded Optoma TW330, which is going for £410 at time of writing.  That is excellent value for money given that most projectors in that range will be 1024x768 native at most, not 1280x800 native (keep an eye out for native resolution, most projector sellers claim their model will "handle" 1080p, but this is done through upscaling and will make your movie look anything but sharp).

*Review Interlude*


The unit is surprisingly quiet in spite of the fan having to keep a 2200 lumen lamp from exploding (not a hint of facetious here), and that lamp gives plenty of brightness even on std-mode with 1700 lumens.  It is audible, but it quickly fades away during gaming since the noise has no irritating frequency (that goes out the window in bright mode, I suggest just turning up the brightness in windows).  Having played Medal of Honor: Airborne on it I can say that it eco-mode might not be to everyone's taste but with lamps costing around £90 I think most can sacrifice 29% brightness for 66% more lamp life.  This is also a Single-Chip DLP model so it suffers from a little colour separation during fast motion (highly noticeable when you shake your head viewing a black background); finally I would like a better contrast ratio than 2000:1 for more defined extremes in the colours, but I'm rapidly disappearing down a rabbit hole here.

*End Review Interlude*


Back to the point at hand, 1280x800 will allow for a detail level of 0.1mm per pixel for a build area of 12.8cm x 8.0cm; I'm looking for a minimum resolution of 0.05mm seeing as I design for FUD on Shapeways (0.1mm Resolution), giving a build area of 6.4cm x 4.0cm.  One of my ideas up to this point was to traverse the projector along a vertical rail, utilizing a redundant RAMPS axis to adjust the build area/resolution balance, but I forgot to account for projector focus; what's worse is that the minimum distance I could get the projector to focus was around 28cm, which gives an image of 197.5mm x 124mm - well above the 64mm x 40mm required.
Despite this, the brightness of the resultant screen area was highly encouraging.
In order to attain this build area, I need to add an adjustable lens with at least 3.0x magnification.  DSLR lenses can be had used for around £50, given that a UV filter is a common accessory it may be that the lens can transmit UV without hindrance, but apparently DSLRs have UV filters of their own and there may be some in the lens too - an optical testbed will be required to fully investigate the matter, as well as some actual 3D resins (no VOCs, please).

Free Ideas Bucket 1.0


I intend this project to be completely open-source, that means any and all STLs and diagrams related to the build will be available royalty-free and not on my Shapeways Shop; if *you* would like to sell it, go ahead but be prepared for a hard time making money given that the models are free and Shapeways can be used by a Bonobo.  Anyhoo, I present my current list of ideas:


  • A standalone built-in computer, either a Raspberry Pi, it's more powerful compatibles or even a full-on x86 PC.  This is to allow the printer to run without having to keep either my PC or Laptop running with it all night.
  • An ultrasound sensor to detect the resin level in the bath and adjust the build platform starting point to suit, this is only relevant to top-down designs.
  • A touchscreen on top of the machine, adjustable to either face outwards (for desk use) or upwards (for floor use).
  • Gullwing doors...  just because...
That concludes the first of hopefully many buildlogs to the SLA 3D Printer Project.  The ultimate aim is to largely free me from having to use Shapeways for every.  single.  solitary.  step.  in the R&D Process for Tawe_TMD.  It's always the way when you make something that you trip up on things you couldn't have predicted, but even if I flounder and fail, I can always watch Zero Punctuation across my wall.

23.1.14

Sirens of the 1080p screen, and the prints of reason.

As far as temptation goes, getting a new PC is up there with crisps positioned but a few feet away after 3 hours of CAD.  I say temptation because my current aim (and New Year's Resolution mind you) is to be able to subsist upon my own business alone - not to have to rely on a job to pay my bills.  I have already made inroads towards this with my Shapeways Shop Tawe_TMD but I've hit a snag:  Research and Development.

I am currently developing my first proper product, which is a Metropolitan Ex-Twin Brake Van from the turn of the century in N gauge (1:148); the body is pretty much sorted out, pending any minor alterations for functionality.  The chassis also pretty much looks like the final iteration, so the bulk of the work is now done leaving me with the R&D associated with functionality - and boy was I in for a ride!
Each one of those strips on the side is 0.1mm high by 0.25mm wide.
In the UK it takes around 3 weeks from order to delivery, in the latter stages of R&D (tweaking) this holds true even for minor changes like increasing the distance between the axle holes; this is doubly frustrating when a mistake is made, such as an item being wrongly printed, this being the direct inspiration for this post and the potential project I will get to in a moment.  Shapeways solved this issue with haste and care and I applaud them for such attention, however, I consider it a call to action for a proper solution.
That solution is my very own SLA (Photo Lithography) 3D Printer; this isn't as difficult as it sounds, because according to many Youtube videos and This Instructable, it is entirely possible to print a 3D object using nothing more than a Z-carriage, a beaker of resin and a DLP Projector.  Feature sizes can be minute, too:  a 1280 x 800 DLP projector (£250 from Ebay) can result in objects up to 12.8 x 8 cm in size with a resolution of 0.1mm in the X and Y; you can even get higher resolutions simply by reducing the distance between the Projector and the resin (e.g:  6.4 x 4 cm with and XY res of 0.05mm).

I have made a not-terribly-professional case study into this idea and found some interesting facets to the idea of running a 3D printer like this:
I was never noted for relishing writing novels...
For the record, here's some additional information for those looking to check all this out (I did this on many assumptions):
  • 1 Metro Brake Van = 2656 mm3
  • I set a budget of £200 for materials, this includes minor electronic items like stepper motors, and any 3D prints for special parts.
  • I don't know what I will coat the build platform with, but it will need to hold things during printing whilst peeling off when done.
  • I assume Council Tax to be included with the Rent.
  • Food + Taxes is broken down thus:

  1. Food = £30/week or £120/month
  2. Income Tax = £38.12/week or £165.19/month from here (assuming gross earnings of £15,000 a year)
  3. The rest is for other things like electricity, gas, water which I can't be stuffed to calculate, but the remaining £164.81 should cover it
  • As for printing, I am assuming a perfect run of setting up supports (SLA prints need copious support material, maybe not in the case of the Metro Brake but I'll apportion it anyway), a successful print owing to a reliable non-stick application (that's what the Sylgard 184 is for - It stops the print from adhering to the resin basin in bottom-up designs), and finally a flawless post-processing run (fat chance...).
It is quite clear to me that running this printer to print Metro Brake Vans to sell is not a viable proposition - even with sufficient resolution, the time spent in preparation will ensure absolutely no free time, an unacceptable situation when this business is intended to help me achieve financial freedom.  3 hours per print sounds low compared to 3 weeks, but remember that Shapeways is taking on all the work in those weeks, and I am free to make new designs while my Metro Brake goes on sale.  This printer makes much more sense for Functional Testing, i.e:  making minor changes around the coupling area or testing strengthening ribs.

To any aspiring Shapies, I say this:  If you have passionate pride in your work, be prepared to test and test and test - go so far as to intentionally break your redundant testing models to reveal weaknesses.  On the note of final presentation, don't be like many of the modellers on this virtual superstore of human creativity and only upload the STL with some token renders; this really shouts "That'll do, next!", and is that the attitude you would tolerate from a carpenter?  An engineer?  A NEST team?  One of the best ways of showing that you have done such testing is to upload a Youtube video that will show it running.

I hope that PC temptation doesn't get the better of me...

5.9.13

Death to interchangeability! And other stuph about my identity...


Seeing this video above got me thinking as to who I really was:  Geek or Nerd?

If you are like me I guarantee that you've come under fire from people who are lauded as "high society" in Secondary School (Guys who want women to be socks and girls who want their men like dividend stocks; basically, both are scum).  Due to the fact that they are usually legendarily thick and unable to close their mouth, they would have called us both with reckless abandon - Incidentally, if one dared to point out the difference, he'd got violently excommunicated for being a "literary faggot".

Anyway, I detest improper use of words like the use of "Gimp" to describe not a male sex slave but "Not cool, nerdy, ugly, stupid. This word can apply to people, places, things, or ideas." (Urban Dictionary), so this is my simple take on the Geek vs. Nerd dilemma based upon the highly-scientific evidence of this video (Well who would you ask? That pusher by the gate who hasn't gotten it up in since the Thatcher era yet has an entourage of squealing sluts wherever he goes?):

  • Geek = Trivial Extrovert - This person tends to identify with a crowd based around a bizarre, non-mainstream subject matter; Trekkies, Sonic Fans and PC gamers all fall under this umbrella.  Basically these are ordinary people following something extraordinary.
  • Nerd = Immersed Introvert - These people prefer to practice their craft on their own and are usually obsessed with something other people find trivial and orthodox; Railfans, Pleasure Pilots and Stamp Collectors are all found here.  Put simply, these are the extraordinary who find interest in the ordinary.
My personal theory regarding how these interact is that the Nerds invent things by tinkering with the mundane, then the Geeks will latch onto the resulting production and support it, eventually making it mainstream.  Keep in mind that these two do in fact blend together to form no distinct black/white but a very granular spectrum throughout the grey; My personal estimate for my Geek/Nerd ratio is 30:70.  What's yours?

One last note, there is no such thing as an 100:0 or an 0:100, just like there are no men completely masculine or women completely feminine.  The aforementioned "high society" may even suggest they are neither, but that'll be proven wrong as soon as they are spotted in a football shirt or a wonky picture with their friends of them topless with "S.L.U.T.S." painted in lipstick across their bellies (lol, geeks for hedonistic sex).

19.7.13

Anna's Analogy

This is a post regarding Anna from Metro: Last Light, I know I'm being completely pathetic about this, but my mind just can't leave this alone!  It keeps returning to it in the most bizarre of situations like waiting for a train or testing out an old hand-me-down laptop for minecraft performance (I'm blogging this on a Toshiba Satellite A215-S4697 with a dead keyboard and dead DVD drive).

Let's recap, when she takes you to murder the Dark One, her first words are "come on, rabbit", wait, what?  Did she mean what I think she means?
Surprisingly not on the first page of google image search even with safesearch off...
Custom PC's review of Metro: Last Light noted that Anna had a "wicked sense of humour" - No objections there!
You can count on your "rabbit" anytime...
Anyway, it's time to put this fuming bollocks to rest, shall we?  I've thought this over and here is my (hopefully FINAL) sequence of events:

  1. Anna has heard of your reputation - she becomes jealous
  2. She berates you as an expression of said jealousy
  3. You get separated, she believes you dieded
  4. She finds you again, she is relieved
  5. She gets captured (yawny bit starts here)
  6. You rescue her, after she gibs your gas mask by running straight into it (RETARD!)
  7. You boink - I like to think it happens to the tune of Benny Benassi's "Satisfaction"
  8. You leave her, she eventually sees you off to war, looking a bit forlorn
  9. She has a kid, and tells him what a lovely protector-slave you are (the greek word serow meant that, and that's where the word hero came from)

So basically, its your good old fashioned hero tale.  Maybe not the most exciting of plots or the most empowering to women (Anna seems to lose strength throughout the game, going from tomboyish sharpshooter to shallow pussy reward for our hero), but I can now at least put it to rest on a humorous note - no more filler like this nonsense, okay?  Good luck, brain...

20.6.13

Perks for Pocket Change: Hobo survival for Graphics Cards

My GTX 560 has really been getting on my nerves recently, with it's fan ragged and rattled by 2 years of only seeing an air duster twice (Delta fans all over the world attempt to pull a Yao Ming face...  and pull it off somehow, stunning server monkeys everywhere).  Problem is, this particular Graphics Card has a proprietary bolt spacing as a result of the GTX 560 spec for such things being "Scatter them over the board for giggles if you like", i.e:  There is no reference card.  It is upon this situation and others like it in future, which I bestow this installment of Perks for Pocket Change:

How to wrap up cool:  GTX 560

The Problem

Taken off google image search on account of "couldn't be stuffed to revert my card" 
As I mentioned before, the fan for my GPU is noisy as hell, due to a combination of the card being OC'd to 952MHz and the fact that the fan bearings are bashed; in any other situation I would by an aftermarket GPU cooler such as the Akasa Vortex Neo, but due to the bizarre bolting that remains out of reach.

The Build:  Phase 1

Only the outer 4 holes are used(?)
I chanced upon a discovery:  An 80mm fan fits snugly in the fan recess once the original fan and shroud are removed; this calls for a hoedown of all the fans I had in storage:
From Left to Right:  Cooler Master 92mm fan (80mm mounts), Intel (Delta) Reference Fan, GTX 480 Reference Fan, Zalman 92mm fan (came from a flower CPU cooler), GTX 560 cooler
Here is a rundown of the fan characteristics:
  • Cooler Master:  Quiet and powerul, but frame wouldn't be too sturdy once it was cut for radial airflow
  • Intel Reference:  Reasonably quiet, good airflow, open and sturdy frame
  • GTX 480:  Showed promise when it sported the same connector as the GTX 560 fan, but stuttered upon application of 5V; doesn't bode well for reliability
  • Zalman:  Simply too big
I ended up selecting the Intel Reference Fan and with a junior hacksaw, cut away the push pins and half the outer frame to get a fitting result:
My handiwork
Cable ties sorted out the mounting issue
Ordinarily, this section would be 'The Perk' detailing how well it turned out, but unfortunate events put paid to those plans; the new arrangement sat idle well enough at around 31 Degrees C at 51MHz (50 Degrees C idling at 952MHz, it does that sometimes), but under Furmark it hit 90 Degrees C and crashed; the prelude to which featured an alarming temperature climb which I have no evidence for sadly, so just take my word for it.

My theory as to why this went down was that the fan that the air was shifting wasn't entering the heatsinks but simply blowing away at the sides since air readily takes the path of least resistance.  This is the wrapping up part of the project where paper...  yes, paper, will come to the fore.

The Build:  Phase 2

A good place to begin is to make some support struts for the shroud you are about to build - to do this you take an offcut of paper long enough for the strut but several times wider, and you fold it up, tape it down, and you have a  sturdy support for the shroud worthy of Brunel...  If the only alternative material was papyrus:
Be sure to channel air through the fins by making the shroud as wide as the fan to begin with, then touching the fins at the end.
The Next step is simple enough - sheet her up!  Also be sure to account for the sides of the fan as otherwise it is these parts that most of the airflow will go instead of the fins.
Legit Larrabee?

The Pocket Change

To make things crystal, I am assuming that the Graphics Card is already owned, and that the items being bought are specifically to initiate this project; so here we have:
  • Intel Reference Fan - £6 on Ebay, and you get a free heatsink for future projects!
  • Paper - I used 80gsm Copy Paper which is around £3 if you take the cheapest packs, that said the choice is ultimately yours and cereal boxes could work even better.
  • Standard and Double-Sided Tape - Poundland offers both for £1 I suspect.
  • Cable ties can be had for as low as £1
Totals out to £12

The Perk

Evaluation will occur based on this scoring system out of 100 points:
  • Cost - for every pound under £30, 1 point is obtained
  • Looks - only 10 points given that I could care less about them
  • Practicality - 60 points, this is the heart of the matter
With that in mind, here are the scores:

Cost:  18 points

While a replacement fan may be cheaper, it would not necessarily be easy to find if possible at all.

Looks:  3 points

Doesn't scream 'Professionalism', so don't think you can get away with this in the IT Dept. unless the computers you work with remain shut for decades at a time.

Practicality:  30 points

While I have noticed a drop in temperature when idling at 952MHz (47 Degrees C vs 50 Before), after a while my PC will still crash when doing Furmark, so maybe that was the result of my own stupidity and pig-headed refusal to downclock back to 810MHz (EDIT:  I've caved in, and the cooler is now capable of sustained 100% running):
Playing Chicken with GPU temps, if only to prove that my card is indeed overclocked (if you can even see that).
Also of a concern is durability, don't go manhandling this card, I'd suggest 3D printing an adjusted shroud - or modifying the stock one - to accomodate the new fan ASAP.

Final Score:  51%

This isn't the kind of handiwork I would rely on for a server, nor would I want people to gaze at it; that said though, it does work well enough while a proper solution to the dilemma is sought.  I can only suggest this when you have a card with a non-reference cooling solution that you want to shut up, but cannot find an aftermarket cooler to fit the bill.

On a side note, I still stand by my previous post; the upshot is that I really don't care who uses the title or the entire system.  I personally love open source stuff even though I am a lamentable coder.

EDIT:  The cooler has disintegrated, I redact the Practicality score to 5 points, making my Final Score 26%; you may have better luck with superglue but then that brings a lack of flexibility into play.

17.6.13

"We're still here if anyone cares!" - minor updates

This is pretty much just a micropost with a few updates wrt blogging matters, done just to keep this page updated while I stall for worthwhile content.

  • I have made leaps and bounds in progress on my carriage, go here for comprehensive updates; point is it shipped today after 5 days(!), apparently will be with me tomorrow (it's currently in Eindhoven, NL).
  • Perks for Pocket Change could see the light of day, but that's in doubt; so if anyone wants a catchy name for a similar series, here you go - I promise I'm no patent troll.
  • I may do some videos on youtube at some point, but expect little to no speech, since my vocals provoke entertainment in the same way that Coppercab's hysterical nonsense provokes rational debate.
That's that.

26.5.13

Refrigerating rubber - mechanized edition

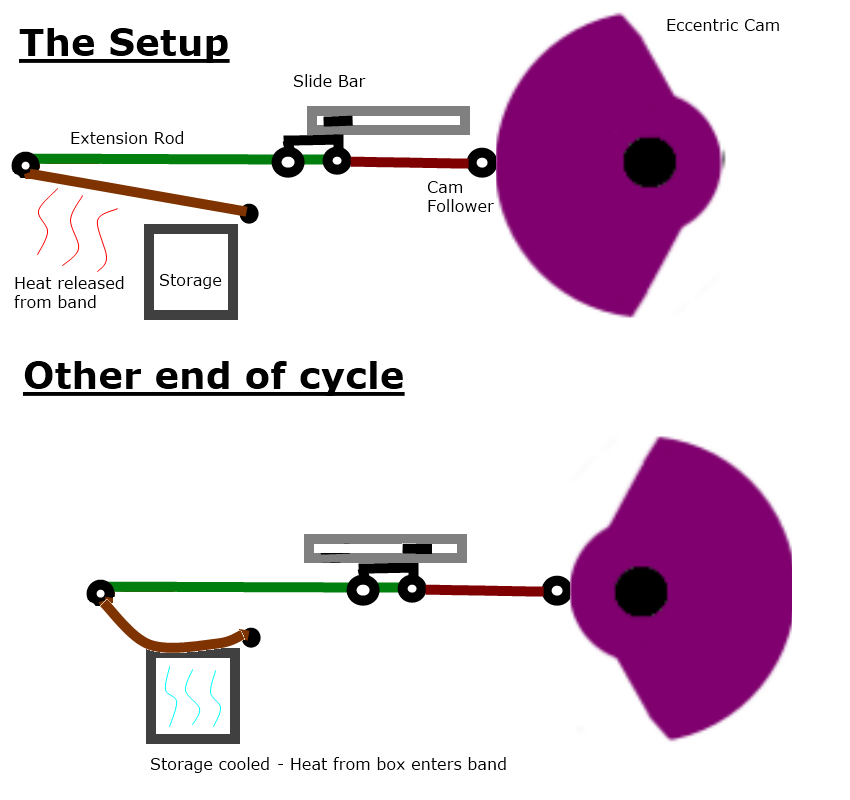
Inspired by this video by the Slingshot Channel (well worth a subscribe!), I had this bizarre idea for a rubber-based refrigerator which could be powered by a constant speed input like a Stirling Engine or a Stepper Motor:


The Eccentric Cam is driven at an exceptionally slow rate - up to 2 rpm at most, this being achieved by copious use of epicyclic gearing (my god am I a fan of that!).  At the extended position (top), the band heats up due to the fact that you have put energy into stretching it, and since nothing is 100% efficient, some energy is lost; in this case it comes out as heat.  This state is maintained by the shape of the cam (constant radius = no movement), letting the band reach room temperature.  The cam follower rides up the slope of the cam (sorry, should have given the follower it's own slide bar to keep it straight) to transition the band into the relaxed state (bottom), the band is allowed to contact the Storage Box, and since it relaxed at room temperature, the band reaches a new, sub-ambient temperature; in order to reach room temperature again the band must take in heat, in this case from the box which renders it cold :)

In principle it is simple enough, but I can't help but feel that a practical model will look relentlessly ridiculous, something not helped by my amateurish late-night drawing.  God knows how many reductions are required, the resulting gearbox probably looks like a Mongolian Death Worm as imagined by Dishonored.  I hope I left you with a mechanical nightmare ;)